Table of Contents
Vacuum Tube SR Latch
Abstract
We investigated 1940s era computers—esp. the ENIAC (Electronic Numerical Integrator And Computer)—and, using this knowledge, designed and constructed a basic bistable functioning element used in digital computers—the Set-Reset Latch, or simply SR Latch. Our ENIAC-based SR Latch design uses four triode vacuum tubes, basic analog components, and optional neon lights for output state indication.
Background Info
The SR Latch
The Set-Reset Latch, or SR Latch, is a basic element in digital computing. It has two inputs, Set and Reset, and either one or two outputs (which we refer to as Q and nQ). Q and nQ are always opposites (hence the binary nomenclature). Our latch is falling-edge triggered, meaning when Set or Reset transitions from a high to low state the states of Q and nQ are updated. Our latch is transparent, meaning the output is updated immediately upon the inputs changing, and it ignores rising-edge transitions. Some latches have enable inputs that can make them opaque, but ours does not offer this feature. We do, however, offer suggestions on how to extend our latch to have an enable input. The logic table for our latch is shown in the table below. A careful reader might notice that the condition for which both set and reset fall at the same time is not shown on the diagram. This case is not possible—in reality, the second edge will take precedence, or internal manufacturing inconsistencies in the tubes will dominate.
Another basic element of digital circuits is the clocked flip-flop. As we note later, the designers of the ENIAC called our edge-triggered latch a flip-flop, but we typically reserve the term flip-flop for a unit that is opaque until a clock edge. It is possible to make a clocked flip-flop from two SR latches with enable inputs.
How Vacuum Tubes Work
| The simple triode symbol on the left shows the three electrodes: cathode (k, heater shown underneath), grid (g), and anode (a). The right side image is the diagram of the 12AX7 with pin layout. |
|---|
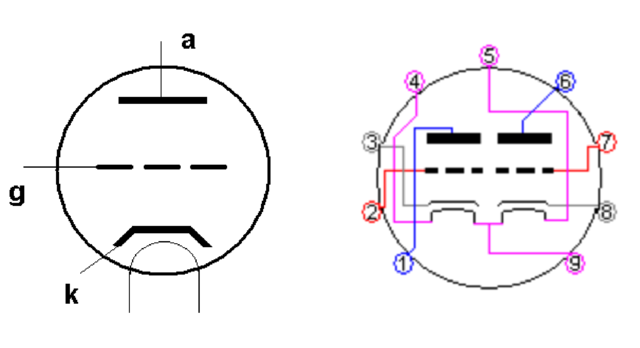 |
A vacuum tube is, at it's highest level of abstraction, a device that controls a flow of current. Vacuum tubes operate on the principle of thermionic emission. Thermionic emission is the principle that energy in the form of heat can induce a flow of electrons from a filament (the heated cathode) to an anode. In the case of a triode, the grid electrode is a mesh or wire grate that allows or blocks thermionic emission to occur between the filament and the anode. The grid is typically held at a negative potential relative to the cathode. The more negative the grid is, the stronger the negative electric field it produces, the stronger the electrons from the cathode are repelled. Control is possible by pulling the grid closer in potential to the cathode (grid more positive), thus allowing electrons to pass through to the anode and current to flow through the tube. A small change in grid potential can produce a large change in current. The ratio of these changes is called the transconductance of the tube, expressed as <math>gm</math>and in units of mhos (inverse ohms). In operation, our tubes have a transconductance of approximately 0.0015 mhos, meaning a change of 1V on the grid produces a change of 1.5mA flowing through the tube.
Why bother with old technology?
Studying the engineering decisions behind old technology is fascinating. Looking around the Internet, descriptions of how vacuum tubes work are sparse and usually focused on audio electronics. We intend this page to become a resource for any designer looking to build digital logic from vacuum tubes, or on a broader scale, someone with a similar background to the authors looking to understand the functioning of vacuum tubes.
Your first tube project?
The authors would not recommend attempting to replicate this project as a first introduction to vacuum tubes, unless one is especially set on doing some sort of digital logic. We would suggest attempting to build a tube-based headphone amplifier, such as this one.
What we did
Re-designing from ENIAC Documentation
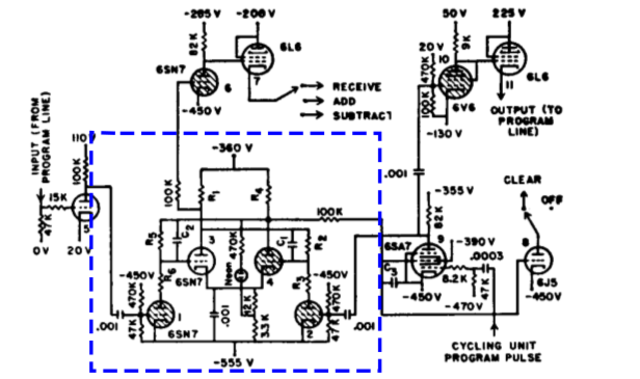
Our design is based around the design we found in this paper.
There are a few “quirks” modern engineers may not be used to when reading the documentation for ENIAC. The first and most obvious is what we call an SR Latch, they call a flip-flop. In current parlance, flip-flops are clocked elements while latches are not—ours are simply transparent.
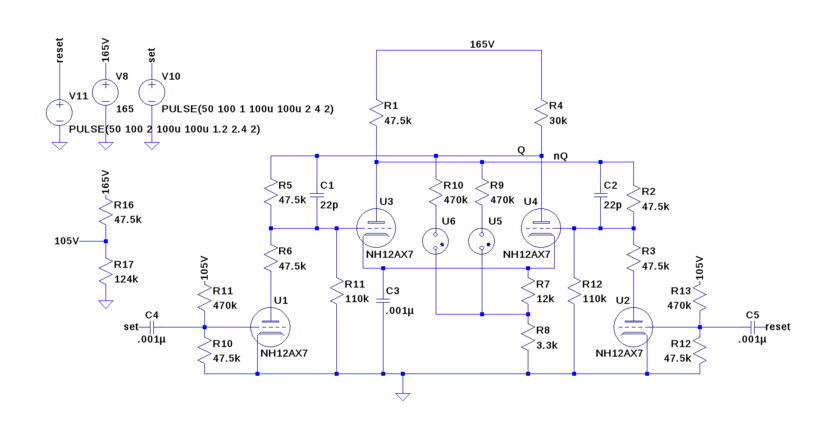
Another feature of old documentation is the units of capacitance—the only unit available was the microfarad. In schematics, capacitors are often not labelled with units, and instead written as “.001” for 1 nanofarad. For even smaller capacitors, the unit we would now call a picofarad was called a micromicrofarad, or μμF. The grid coupling capacitors in our schematic have values of 22 μμF.
Regarding the values of components, it seems the EIA series were not commonly followed for capacitors at the time. 25pF capacitors are rather difficult to find—fortunately 22pF capacitors are perfectly acceptable substitutes and 25pF is within the tolerance for most common 22pF capacitors.
Reading the schematics from the ENIAC documentation is a little tricky, because they do not add the conventional connection dots on their schematics when connections end in a “T.”
The ENIAC used 6SN7 dual triode tubes. Unfortunately, 6SN7 tubes are very hard to come by, as they have been entirely replaced by the ECC40 tube, and subsequently in 1946, the 12AU7. The 12AU7 is currently popular for audio electronics, specifically headphone amplifiers. Due to this popularity, it is difficult to find 12AU7 tubes for a reasonable price. The 12AX7 is a similar tube with a higher gain that is popular in modern guitar amplifiers which we chose primairy for its low cost (due to being currently in production).
Building up from an SR Latch
The Circuit
The following figure shows a circuit diagram of the ENIAC's Accumulator program control circuit. We took the SR Latch from this circuit (subcircuit inside blue dashed lines) to make our SR Latch. “Set” is the input to the 0.001μF capacitor leading to triode 1 (U1 in our version), and “Reset” is the input to the 0.001μF capacitor leading into triode 2 (U2 in our version). The neon light connected to Q indicates the states of Q and nQ.
Our SR Latch design (shown below) was simulated in LTSpice and implemented with two 12AX7 dual triode vacuum tubes and two neon lights to indicate the states of Q and nQ. You can download our spice file here. Make sure the .inc file is in the same directory as the .asc file. In the SRLatch.asc file, there is more than the SR latch we built. In addition, we also provide a structure for a pulse inverter using two triodes (which produces both positive and negative pulses at both the rising and falling edges of an input) and a possible structure for adding an enable input. The pulse generator works quite well, the enable input is significantly more dependent on the input voltages being in the correct range. Regarding simulating the circuit, we used tube models that were in the “heated” state (the model is named NH12AX7). In the same 12AX7.inc model file, the 12AX7 model includes a heater parameter, so it is possible to simulate what happens when the heater is in an undervoltage condition or during startup when the heater is still warming up (and the tube is not ready to conduct yet).
To provide the 12V for the heaters, we simply purchased a modern switched-mode 12V power supply. In reality, the heaters would have most likely been fed from a transformer tap specifically designed to power the heaters. To provide the 165V for the positive rail, we simply directly rectified a 110V mains input and filtered it with a 120μF photoflash capacitor. For increased safety, it would have been better to use an isolation transformer, but we will leave this improvement for future engineers.
We tried several spice models, but we found the best ones here.
Mechanical Design
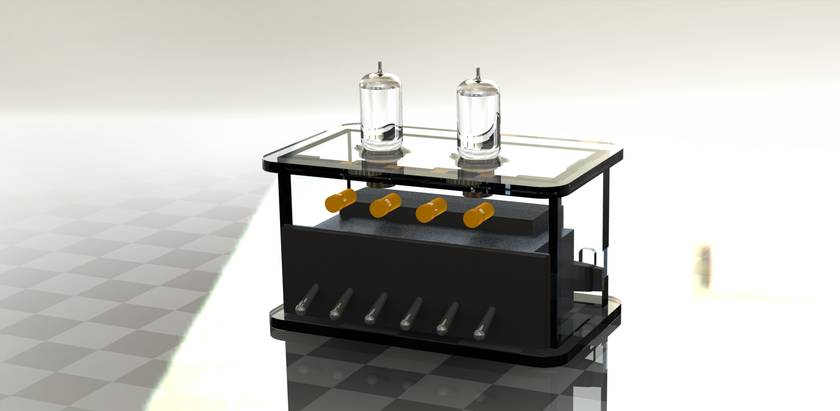
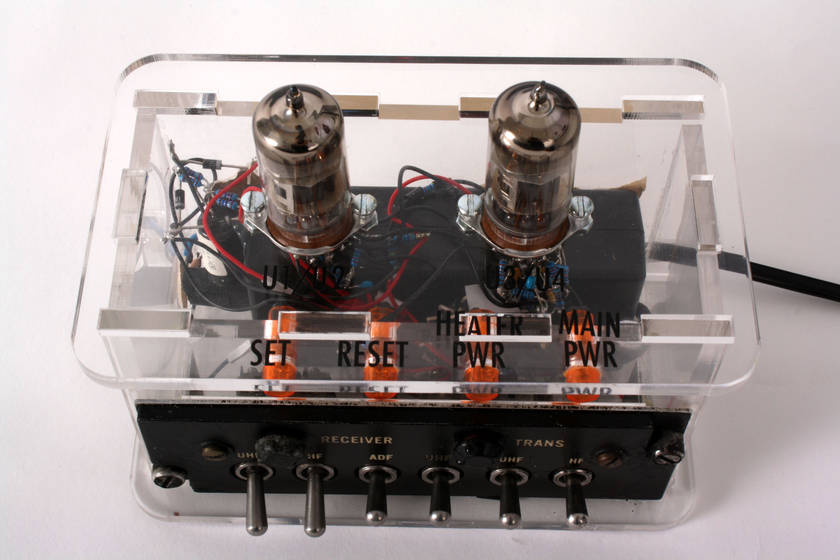
We designed an enclosure for our SR Latch out of 1/4“ acrylic. We used period-correct orange neon lights as indicators for Power On, Heaters On, Q and nQ. We have uploaded our CAD files (designed in SolidWorks 2014) here.
Analysis of Our Plan
We stated that building an SR latch was a yellow “intermediate” goal, and we're happy to have accomplished this. We did investigate doing other digital logic with vacuum tubes. We found a source called What Computers are Made From that has two schematics: a tube NOR gate shown as two triodes with their plates tied together, and a tube NAND gate that is shown as a pentode with the top and bottom grids attached to the inputs. While we purchased a few pentode tubes, we decided to focus on the 12AX7s. In our SPICE file, we began experimenting with making an AND gate out of 12AX7 triodes. Under incredibly specific input conditions, it worked well, but it required precise voltage dividers and would probably be a pain to construct.
A “gotcha” we encountered when building our mechanical system was trying to fit our circuitry into the box. Our latch worked outside of the box, but when we closed the box it caused one of our outputs to short. It's always a good idea to use removable glue the first time you glue your box together!


