Table of Contents
8-Bit Minecraft CPU
Our computers and laptops are literally a big black box with a monitor, keyboard, and mouse. What is going on inside? Circuit diagrams have all the answers…except they are impossible to figure out unless you spend an entire semester trying to understand them. Our solution is to build a CPU in Minecraft, a popular sandbox game in which players can build various types of “blocks” and “objects” which interact with each other and the player.
Our goals for this project are to:
- Design an 8-bit computer architecture with a 192 total bytes of memory (128 bytes of instruction memory + 64 bytes of data memory) and 8 total one-byte registers (4 architecture specific registers and 4 general registers).
- Implement our 8-bit CPU into a Minecraft world using a RedPower modpack which contains basic electrical components (such as logic gates, flip flops and latches, clocks, and multiplexers)
- Execute programs through our CPU by loading the instruction memory and checking the outputs of the registers or data memory
- Build the world in a way such that non-specialized person could learn about the different components of a CPU by roaming our world and stepping through the instructions
Why would we create this MONSTERRRR?!?!?!?
There are three major reasons we wanted to create an 8-bit CPU in Minecraft.
- We believe that everyone should learn about what is happening inside of their computers, and be able to do it within an hours time. We don't expect people to learn the circuitry behind the entire system, but it will be more than sufficient if they understand what each of the modules of a CPU represent and how each module interacts with the other modules. If they are planning to take a Computer Architecture class (or something similar), our Minecraft world will serve as a good introduction to CPUs. Education is power!
- We loved taking our Computer Architecture class and thought it would be fun to try designing our own architecture for an 8-bit CPU from scratch. It was not an easy task to build the entire CPU in Minecraft, but we feel like we learned a lot more about CPU's in general, and it will be much easier for us to retain this knowledge for the rest of our lives.
- Minecraft is so much goddamn fun! What is the most efficient way of playing Minecraft and get Computer Architecture done at the same time? Build a CPU in Minecraft! We have successfully hit two birds with one stone, and we have no regrets at all choosing this project. Each intellectual challenge that we faced during this project was puzzling and exciting for us to solve!
The Process
Expect this section to be fairly long. We will explain to you EXACTLY how we did everything. This includes designing our 8-bit architecture, writing assembly language to execute certain tasks, building our designed CPU in Minecraft, and setting up our world so that it is easy for non-specialized individuals to learn about how a CPU works.
Designing an 8-bit Computer Architecture
Specifications
Before we started designing our architecture, we needed to decide on the specifications of our architecture. The following describes our CPU using words:
- 8-bit CPU. This means that each of our registers, memory space, and instructions will be 8 bits long.
- Single-cycle CPU. Each instruction takes exactly one cycle to be completed.
- 64-byte data memory
- 128-byte instruction memory
- 8 registers (each are 1 byte big)
- 1 byte Program Counter
Registers
The following is the list of registers we have. We have a total of 8 registers, each having the size of a single byte. The first four registers are reserved for the CPU and each serves a specific purpose for the execution of each instruction. The remaining registers are general purpose registers for the programmer to manipulate however he/she pleases.
Register: $ACC
Purpose: [ACCumulator] Certain operations, such as adding immediates, can only be done to the accumulator register. This is necessary in order to accomodate all possible operations possible.
Register:$DMP
Purpose: [Data Memory Pointer] The user will only be able to access the address in the data memory indicated by the Data Memory Pointer.
Register:$JP
Purpose: [Jump Pointer] Whenever we need to jump to or branch to a specific point in the data memory, the program counter will change to the value located in $JP.
Register: $Z
Purpose:[Zero] This register is always set to 0.
Register: $G0
Purpose: General purpose register 0
Register: $G1
Purpose: General purpose register 1
Register: $G2
Purpose: General purpose register 2
Register: $G3
Purpose: General purpose register 3
Instruction Set
Our CPU will be able to execute the following instructions. If you want to make a program, the following section will serve as the documentation required to create the program.
Instruction: MOVA
Format: | 000aaabb |
Description: [MOVe values (extra A)] Move the value from register $b to $a. $a=$b. Notice that only 2 bits have been allocated for the $b register, even though there are 8 registers. $b registers may only select general registers. (00 selects $G0, 11 selects $G3)
Instruction: MOVB
Format: | 001aabbb |
Description: [MOVe values (extra B)] Move the value from register $b to $a. $a=$b. Notice that only 2 bits have been allocated for the $a register, even though there are 8 registers. $a registers may only select general registers. (00 selects $G0, 11 selects $G3)
Instruction:JE
Format: | 010aaabb |
Description: [Jump if Equal] Jump to a different location in the program if the equal condition is met. The program counter will be set to the value located in $JP when the value at register $a is the same as the value at register $b. Note that because there are 2 bits for b, $b will always be a general register. (00 selects $G0, 11 selects $G3). For an unconditional branch, set $a=$b.
Instruction:ADDR
Format: | 011aaaxx |
Description: [ADD Register] Add a register value to the accumulator. $ACC = $ACC + $a.
Instruction:ADD
Format: | 100iiiis |
Description: [ADD] Add an immediate value to the accumulator. If s=0, then $ACC=$ACC+0000iiii. If s=1, then $ACC=$ACC+iiii0000.
Instruction:RES
Format: | 101xxxxx |
Description: [RESet] Reset the accumulator to zero. $ACC = $Z.
Instruction: TW
Format: | 110aaaxs |
Description: [Transfer Word] If s = 0, store a byte from the register file to the data memory. The value in register $a will be stored to the address in the data memory indicated by $DMP. If s=1, load a byte from the data memory to the register file. The value stored in the address in the data memory indicated by $DMP will be stored to register $a.
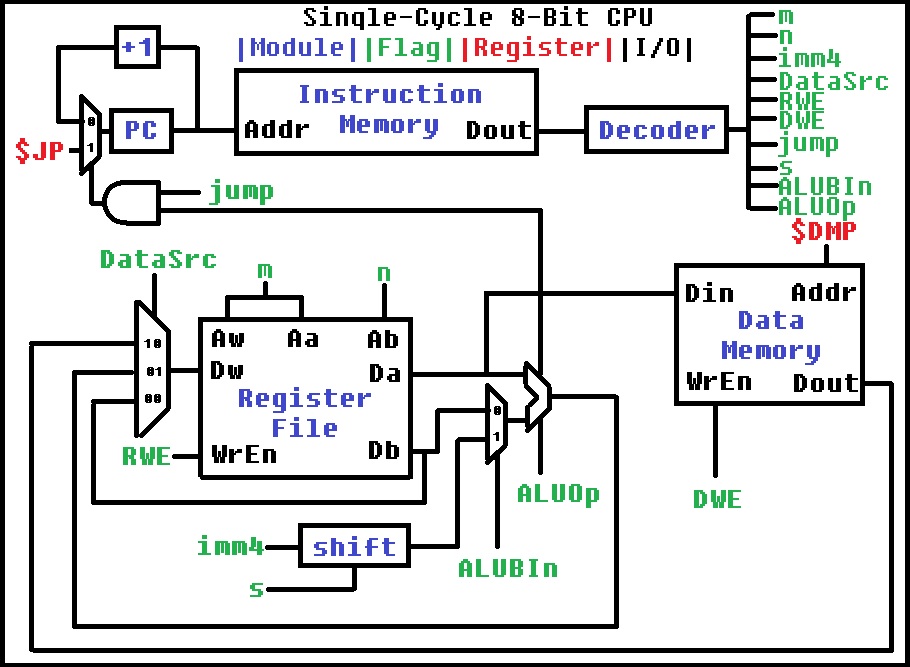
Final Schematic
The following is the final overall schematic of our 8-bit CPU.
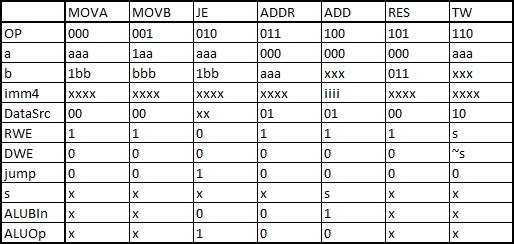
 The following is a table depicting how the values of each flag is calculated

Building the World
In order to build the world, we used a mod pack called Feed The Beast Ultimate. It contains many different mods which made this project possible. The main mod we used was called RedPower, which contains many different logic gates and other circuit components with which we could build our CPU with. We then used MCedit to copy and paste large chunks of repeatable blocks. The following videos show off our world and CPU, and help give a sense of how we built it.
CompArch Project 8-Bit Minecraft CPU pt.1
CompArch Project 8-Bit Minecraft CPU pt.2
Future Work
We spend a lot of time on this, but there is still a lot of work that can be done on this. For this reason, we are releasing all of our documentation and our world. All instructions will be included in this zip file. The following improvements are to be made:
- Minimizing glitches
- Optimizing speed
- Optimizing space
- Expanding CPU Size
- Automated Loading of Instruction Memory.
Please enjoy!
