Table of Contents
(old) Jenzabar CX 8.1 Client Configuration
THIS IS LEGACY INFORMATION. PLEASE SEE: Olin College Jenzabar Environment
.
.
.
.
.
.
The Jenzabar CX 8.1 menu is a Java-based user interface. Your system will need to have the 32-bit version of Java 7 or later installed and properly configured or it will not be able to connect to the CX server.
Verify Java Version and Architecture
Before proceeding, verify that you have the correct version and architecture of Java installed.
- Go to Start > Control Panel > Programs > Programs and Features
- Scroll down to check the versions of Java installed
- Uninstall any versions of Java 6 and Java 7
- Install the latest version of Java
- Select “Windows Offline (32-bit)“
- Run the downloaded installer
Configure Java 8
Java 8 will not permit self-signed applications to run without first adding security exceptions for them. Because Jenzabar CX 8.1 code is still signed with a self-signed certificate as of July 2014, creating these exceptions is a mandatory step.
- Go to Start > Java > Configure Java to open the Java Control Panel
- Click on the Security tab
- Click on the Edit Site List… button to add sites to the list
- In the newly-opened Exception Site List window, click the Add button
- Type or paste the following to allow connections to the live database, and hit
Enterwhen complete:
https://cx01.olin.edu:9040
- Click the Add button again
- Type or paste the following to allow connections to the train database, and again hit
Enterwhen complete:
https://cx01.olin.edu:9045
- Click OK to accept these changes and close the Exception Site List window
- Click OK to close the Java Control Panel
Running CX 8.1
Beginning with Java 8, CX 8.1 must be launched from a web browser.
- In your web browser, visit the appropriate site:
- For the live database, browse to https://cx01.olin.edu:9040/CXConnect.htm
- For the train database, browse to https://cx01.olin.edu:9045/CXConnect.htm
- Click on the Run Jenzabar CX link
- Continue to Starting the Menu below
For ease of use, it is strongly recommended that both of these URLs be added to your web browser as favorites / bookmarks. Once created, you can drag them to your desktop to create shortcuts if you wish.
Starting the Menu
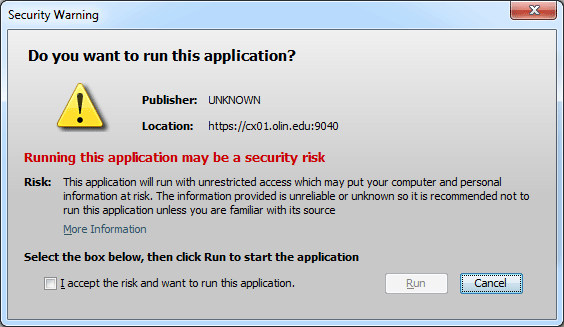
- Click on the checkbox next to
I accept the risk and want to run this application.- It is important to note that this is the only security warning you should accept – all other security warnings on your system should be heeded and treated with extreme caution!
- Click on the Run button to launch the menu
Configuring Helper Apps
Configure the CX 8.1 menu Helper Applications
- Select a menu item that launches a Jenzabar CX menu window in the right pane
- From the Jenzabar CX Menu menu items, Select Edit, Preferences
- To update Keyboard functions (Enter key)
- Select Keyboard tab at the top of the User Preferences window
- Select the function you wish the Enter key to perform (Execute or Next Field)
- Select Auto Next Field if desired
- Select Auto Select Field if desired
- Select Apply
- To update Helper Apps (Using Word as your Output Viewer):
- Select the Helper tab at the top of the User Preferences window
- Select Output Viewer
- Select the Launch Program button
- Enter into the program box:
- For MS Word 2016 64-bit, enter: C:\Program Files\Microsoft Office\Office16\winword.exe
- For MS Word 365, enter: C:\Program Files\Microsoft Office\root\Office16\winword.exe
- You can alternately browse to the location of your MS Word executable
- Select apply
- Select OK
- Esc out of the CX menu option.


